Wednesday, December 27, 2017

How to Keep Kids Motivated to Play Recorders

About a year and a half ago, I wrote a post about teaching recorders by starting on E. It totally changed my beginning recorder program and truly made a difference in the tone of my beginning students. Two years later, I am still sold!

 My students cannot get enough of these squeaky little instruments. I am asked DAILY "when are we gonna play for belts?" It took me a while to figure out how to carve out time for individual testing for new belts BUT... this is my current strategy.


On the first week of the month, I set aside MOST of the class time to work on belt songs. I pair students up according to what song they are working on. For the kids who are several belts behind most of the class, they get to choose another student who has mastered a few more belts than they have and get "tutored"! THEY LOVE THIS - both parties, the tutor and the "tutee"!


All the kids are playing at once or taking turns with their partner. Yes! it is quite a cacophony BUT the kids are SO motivated to practice! When a student feels prepared to play for a belt, s/he walks up to me to perform. I usually have a waiting line. In addition to listening, I am always scanning the room to ensure that everyone is on task!


I LOVE the motivation this first week of the month generates and I want to keep it going. So I open my room up twice a week for a half hour before school to let individuals play for belts too.

How do you work recorders into your curriculum? I'd love to hear!

Happy Honking! Ellen

Don't miss this week's Musician in the Spotlight
 ...   Men and Women of American Idol


Be the first person to leave a comment below and I will send them to you for free! 


Visit my store at https://www.teacherspayteachers.com/Store/Harmony-In-The-Hood

Saturday, October 21, 2017

How to survive interruptions to your plans

Half days. Early dismissal days. Teacher work days. Even assemblies. If you are on a weekly schedule (in other words, you meet with the same classes on the same day of the week), this can really throw off your attempt to keep all your classes on the same page.
After a couple of these days, you probably want to throw up your hands in frustration!

Relax! It's all good!


First of all, take a deep breath and remind yourself...you love this job! You chose it because you love working with kids, you love music, you want to share your love of your subject with your students, perhaps even inspire them. So...with your attitude realigned, let's talk about what is truly important and what you can let go of.

Adapt your lessons. If all your 5th grade classes learned "casting off" with Alabama Gal but 2 classes missed it, YOU get to decide what was important about the lesson and what could be dropped out. If you dance alot in music class and the 5th graders will be learning more dances incorporating "casting off", then that dance step is probably not one to skip.
So as you review last weeks' lesson with all the kids that learned "casting off" last week (kids LOVE repetition but change it up a little), teach Alabama Gal to the kids that missed it. And then like Elsa, LET IT GO!

If you try to cram all of the material you covered in 2 lessons with the majority of the classes into 1 lesson with the kids you missed, you will stress yourself out and the joy of the material will not reach your students. And isn't that the point?

We have the loveliest job! To teach kids how to connect to the beauty of music. Obviously music means a great deal to you or you wouldn't be in this business.
Don't forget WHY you are here!

To make a difference! This is all about ATTITUDE here!

On the surface, you may feel like you are just a break for classroom teachers. They may not realize that you actually have plans and standards that you are planning to teach. But quite honestly, we are ALL in our own little microcosms. Classroom teachers are focused on their plans and standards just like we are. Sometimes you meet some classroom teachers who "get it". They understand that we are actually teaching content. CHERISH THEM!

For the others who cannot see beyond themselves, be kind. People cannot understand what they have not experienced. Be patient with adults as well as kids. Again your attitude says so much about who you are.
And how people will accept your music program.

You can't do everything! Do what you can and remember to make it musical and joyful. That is what the kids will remember!


Hang in there! Ellen

Don't miss this week's Musician in the Spotlight
 ... the very sassy  Mariah Carey

Be the first person to leave a comment below and I will send it to you for free! 


Visit my store at https://www.teacherspayteachers.com/Store/Harmony-In-The-Hood

Saturday, October 14, 2017

Moving Your Music Classroom?

©EduClips
The beginning of the year you set up your Music room just the way you want it.  It's organized and easy to maintain. You teach your students how to enter and exit in an orderly manner. Things are flowing the way you'd like and then...

there's a change in your space. It could be some kind of school construction or you could lose your room to a new section of first grade. This will require you to have a different space... now... just after you've gotten your students into a routine!

So... how do you set up a new space and keep similar routines? You realize that you cannot get everything in place before the classes start coming. The school schedule must go on. What can you make sure is ready before the kids arrive and what can you add little by little?

SET UP THE PHYSICAL SPACE the way you want. 


1)Are you setting up the seating in a semi-circle or in rows? Think about where you "present" most of your lessons: near the Smart board? next to your instruments? by the piano?

Do you have a "front" of the room where the students will face most of the time? If you use a rug or chairs or sit spots, decide where they work best and put them in place.


2) If your students bring their lunch boxes because they go right to lunch after your class, where should they put them? The special area teacher across from me has her students place their lunch boxes in a neat square (marked off by tape) in the hall outside the room. In the Music Room, I have a table and the kids put their lunch boxes under it.

Water bottles are commonplace in my school so I have a small area next to the table for them. I keep them separate so that a leaky water bottle does not get lunch bags wet. (Lesson learned from experience.)

3) Think about where you will set up your instruments (or at least store them).
©EduClips
Will your students move to this space or will you bring the instruments to them? If you teach different grade levels in a row, can your change what materials you are using easily or will you need to use the same stuff class after class (no matter what grade) because there is no time in your schedule to exchange materials?

NEXT, DETERMINE YOUR ROUTINES


After you've figured out how you are going to set up the physical space, think about how you will get your students in and out of the room. How will they move from the entrance to their place in the room? I use assigned seats for a few reasons: knowing where to sit creates better flow and less confusion. Now how will the kids exit your room? How will they gather their lunchboxes, etc?

Once you have your physical space and transition routines figured out, you can add your posters, silent teachers, etc. as time allows. Don't worry about getting that done right away unless you have the time.

The change in your Music Room will definitely affect your students. Most likely they will be taking it all in and not be as focused as usual. Go with the flow. Remind them of your classroom routines. Refocus them if necessary. It's almost like the first week of school all over again but they should respond more quickly.

Your classroom is a place where you spend ALOT of your time. Be thoughtful about how it will work FOR you.

If you have a topic you would like me to cover, please feel free to suggest it in the comments below.

Happy Honking! Ellen

This week's Musician in the Spotlight is country music superstar Tim McGraw. Be the first person to PM me on Facebook and I will send it to you for free! 

Facebook Link


Saturday, October 7, 2017

Organizing Tips for Boomwhackers

Boomwhackers
artwork by Music K-8 magazine
- you know, those colorful plastic tubes that kids love to play! As fun as they are, these enticing instruments can be a challenge to organize and store.

Big bins can make this much easier. Separating them into 2 groups can keep them even more organized: diatonic (C-c) and chromatic add-ons (the sharps/flats).


When preparing for the week's lessons, try separating the boomwhackers according to which notes you will use and then put those in a smaller bin(s). For example, if your third graders will be using D-A for a steady beat (great as a substitute for a level bordun on an Orff instrument), gather those tubes and put them in a temporary bin or crate for use in class. In a different bin you will put the D pentatonic tubes for your fourth graders.


When teaching harmony, divide the I chord and the V chord boomwhackers and put in bins labeled as such for your fifth graders.


In an earlier post, I discussed the use of classroom helpers. When the bins are labeled by grade level, helpers can easily get the them for the class. Smooth set up and pick up during class - who doesn't want that??!!

Organizing is a HUGE way to give you more energy - both physical and mental. I would love for you to share with me how you organize materials. Why not leave a comment below?

Happy Honking! Ellen

Hispanic Heritage Month is in full swing! Here are a few products that promote Hispanic music...


There are TONS of Musicians in the Spotlight at https://www.teacherspayteachers.com/Store/Harmony-In-The-Hood 

Saturday, September 30, 2017

Beating the Sunday Night Blues

The Sunday night blues is a real thing! It can sometimes rob you of half of your weekend. You wake up Sunday morning and you realize you have to plan for Monday (tomorrow) and it bums out you! The amount of time you spend thinking, dreading and doing it really saps your energy too.

Why not try making the "start" of your week on a Wednesday?

You wake up Sunday morning and you realize, "hey, I've already done my plans! I can relax, enjoy doing things that I want to do and not have to worry/dread/stress about planning for this week."

As a Music teacher or special area teacher, you probably plan for the span of time between when you see the same class. Your classes could meet once a week, once every 6 days or something different. You probably plan one lesson for each grade level and you don't need a new lesson until you've taught all of your classes. Generally we consider Monday as the start of the week. But it doesn't have to be. Why not pick another day? You'll still see the same classes, just teach them in a different order.

For example, Wednesday is now your "new Monday". You think about your upcoming lessons on Monday during your planning period or after school and write down your plans. Then on Tuesday,  you fine tune the plans, create any powerpoints, Smart board notebook files and/or playlists and double check that you have all the materials you'll need. On Wednesday you begin the new lessons and teach them until next Tuesday. And voila! No more Sunday night blues!

Give it a try and let me know how this worked out for you!

Happy Honking! Ellen


Sunday, September 24, 2017

Making the Most of a Few Instruments

Using hand instruments in the music room seems like an obvious activity...unless you don't have many instruments.

How do you give your students the opportunity to play when you only have a few instruments?

First, choose an ACTIVITY that can be performed with both BODY PERCUSSION (clap, snap, pat, etc.) and hand INSTRUMENTS. You can adapt an Orff piece from some of the myriad of resources available or from your text series. Change it up: substitute body percussion for each of the parts and these will later evolve into instrument parts.

Disclaimer: Make sure you REALLY like the piece because you are going to hear it ALOT!!

EX. You have 5 triangles, 5 hand drums and 5 sets of rhythm sticks.


A) You teach everyone the 1st part with body percussion. Have them perform it successfully without you. Then have them perform the 1st part while you play the 2nd part. Teach them the 2nd part.

B) Divide the class into 2 groups. Have each group perform 1 of the patterns at the same time. Switch the parts giving students an opportunity to perform both parts. Then have them perform their parts while you perform the 3rd part. Teach them the 3rd part.

C) Divide your class into 3 groups. One group for each part - all using body percussion. Give every group an opportunity to play each part while the other parts are playing along too.

D) Now you add the INSTRUMENTS! YIPPEE! Demonstrate the proper way to hold and play each instrument.

E) Five kids out of group 1 play their rhythm on the triangles while the rest of Group 1 supports them with body percussion. Five kids out of group 2 play their rhythm on the hand drums while the rest of Group 2 supports them with body percussion. And the same for group 3 and the rhythm sticks.

F) Perform the piece several times. Then WITHIN EACH GROUP those who were playing the instrument will SWITCH back to body percussion and those who haven't played an instrument take their turns. Again perform the piece several times.

G) Now the groups will ROTATE to the next instrument. Group 1 kids will now play the hand drum part. Group 2 will now play the rhythm stick part. And Group 3 will now play the triangle part. Again, only about 1/2 of the students will be playing the instruments, the rest of the group will still be doing body percussion. Then SWITCH with the group.

H) REPEAT this one more time so that each group of students will have played all 3 of the instruments.

Use the space of the room you are teaching in and separate the groups physically. When you are ready to have the students move to the next space (group), have a SIGNAL. For example, before giving directions about where each group goes begin with "when I clap, group 1 goes to where group 2 is, group 2 goes...etc." The clap is the signal that they should be waiting for. If your students move before your signal, stop the class, have them go back to where they started and wait for the signal again. FYI having kids transition with NO SIGNAL = CHAOS!

I hope this was helpful. I'd love to hear how this worked for you so please leave a comment below.

Happy Honking! Ellen

I just posted one of my BEST resources on TeachersPayTeachers. Music Terms & Vocabulary posters. - almost 100 posters! Just print and hang!
You can get it for free! Send me an email at harmonyinthehood.com and I will tell you how.

One reviewer wrote "This wonderful file will be great for all ages. The specific graphics will be helpful for students also! Thank you!!"

Another reviewer wrote "This will be a great starting point for me as I put together a unit on musical decades!"

Don't miss this great opportunity to get this awesome resource for FREE!

Saturday, September 16, 2017

4 Reasons to Dance

Kids need to move - we all know that. And yes, GoNoodle is a wonderful brain break for the kids in the classroom. But using dance in the Music room is different.

Phyllis Weikart is the accepted authority on using pattern dances in the music class. Her Rhythmically Moving series is the ultimate source for step by step instructions for folk dances from ALL over the world.

But when your principal walks by your room and questions why your students are movin' and groovin', here are 4 valid reasons to give to him or her.

1. It's truly engaging. The idea is simple. All of us retain whatever we are learning if we are truly interested. Because dancing is so enjoyable, your students will be focused and joining in the fun. Even reluctant students will see their classmates have a blast and they won't be able to stop themselves from giving it a try.

2. Kids are actively listening, not passively sitting. Now knowing how to listen to music in a concert is definitely a desired skill to have your students master. This kind of listening is different. Students must listen to the music in order to move at the correct time. They listen for melodies, repeated sections and changes in phrases and tempo. And they can demonstrate with their bodies that they are understanding what they are hearing.

3. Dancing is social. Brain research tells us that we are social creatures and we retain material better when we are participating and sharing it with others. It requires using appropriate behavior. It encourages cooperation and support among all peer groups. When students make mistakes, their classmates are ready to help them get back on track in order to keep the dance going. Students frequently laugh at their own mistakes so the stress level of trying something is reduced, even eliminated.

4. Dancing exposes kids to music from all over the world.
The Music Education National Standards mention becoming familiar with folk music from all cultures. As we know, music, particularly from our own personal background, evokes emotion. Connecting students to music of different heritages brings an understanding on this more emotional level as well as an intellectual one.

Introducing dance into your music curriculum is sound pedagogy It's also really enjoyable!

As always, I'd love to know if you've used dance in your music classes. Please leave a comment below.

Happy Honking! Ellen

Saturday, September 9, 2017

Smart Organization: the Smart board

Smart boards are a GREAT tool in the Music room! If you are one of the lucky ones to have a Smart board in your room or in the rooms where you teach, it can make your lessons flow and keep you on track.

If you have no Smart board BUT you do have a projector and screen you can use this same strategy using Powerpoint or Google Slides.

This saves you from hauling a dozen posters with you to every room you teach in. It's in the cloud or on your flash drive. Let's take a look at this amazing tool slide by slide.

1. The board is displaying a message for your students to read as soon as they enter your room, ie. What can you tell me about Mozart? Or can you name a percussion instrument and explain how to play it?

I love "would you rather"s. Rachel Lynette has a bunch of free ones.


After briefly discussing the responses, you continue with the next slide.

2. In this slide there are pictures that link to various song lyrics in Powerpoint or other Smart Notebook files. Each picture represents a song for a grade level so if you teach 5 grade levels then you have 5 pictures.

I totally LOVE Music K-8 magazine!
They have created the powerpoints for you!

3. Rhythmic reading can be slide 3 (and 4, 5, etc. depending on how many grades you have.) One slide for each grade level. Rhythmic passages that scaffold from one grade to another help to keep you on track when teaching multiple grades. Students read the rhythms with syllables, clap them, and even add hand percussion.


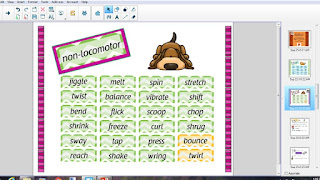
4. Following the rhythm slides are the slides that display the main activity of each of your lessons. These are the slides where you have different types of locomotor and non-locomotor movements for 2nd grade. Or on the next slide you might visually break down the 3 body percussion parts of the 5th grade piece.


Make it interactive. Have the kids come to the board and circle their choice.
Thanks to David Row at Making Moments Matter.

5. Nearing the end of your music lesson, you might calm everyone with a listening activity. Slides that introduce or review a certain style of music or specific composer.


Or again make it interactive


Now you have reached the end of your lesson. Your students exit your room and you start the presentation all over with the next class. If you have different grade level classes every period, this can really save your brain! 

It's all contained in one place. 

It goes in the order YOU want the lesson to go. 

It is highly visual in a class that is basically auditory. 

It gives your students something to look at while learning and listening.

Does creating this presentation take time every week or every 6 days or however your schedule falls? Yes it does- the 1st year! Is it worth it? ABSOLUTELY! Just like writing plans or creating lessons takes time, it is an investment in your future as a teacher. The beauty of these presentations is that once you've made them, you can use them next year and over and over. It bears repeating - it is totally worth your time.

If you do something different that works for you, I would LOVE to see it the comments below!

Happy Honking! Ellen

Saturday, September 2, 2017

Parent Contact: the Phone Call (with a script!)

Following up on last week's post "The Secret to Parent Contact", I'd like to share another way to make positive connections with parents....the phone!

Positive phone calls home are great for a few reasons.

1. If you tell your students that you will be watching the class and making one positive phone call home to someone's parent, it is amazing how motivated students become to impress you in order to get that phone call. (sa-weet management strategy)

2. Parents LOVE to hear compliments about their kids! After all, your students are someone's "pride and joy". Who doesn't want to hear someone else find their child doing a great job?! And especially the teacher!

3. By calling the parent or even leaving a voice mail, you have made the first step toward establishing a good working relationship. Later if you need to make a call regarding the child's poor behavior, the parent knows that you are not just calling to complain. And let's face it, most calls from teachers to parents are about just that - poor behavior. If you have already shown the parent that you have seen the good stuff from the kid, they are more likely to support you when you call about some not-so-good stuff. You become a team, trying to shape this kid into a good human being. C'mon, that's one of the great things about teaching, right?

Don't be afraid of parent phone calls. And don't think that your input doesn't matter just because you are not the child's classroom teacher! IT DOES!

So...you chose one student a week or one per class. When do you find time to make these calls? Cause let's face it, there's never enough time. Choose a small block of time at the end of the day or end of the week.

Have the phone numbers ready and even a sheet of paper for a log to jot down whether you actually talked to someone or if you left a message. Then take a deep breath and make the call(s). It does not take much time to say a quick hello and praise their child. You leave the parent feeling good and you will feel awesome as well.

Eek! But what do you say exactly? 
Here is a sample script.

Hi, this is John Lee, the music teacher at Parker Elementary School. I'm calling about Jonah Smith. Is this Jonah's mother? I'm just calling today to tell you what a great job Jonah did in Music today. He was super helpful to his classmates, showing them the proper way to hold the recorder. He was patient and positive and his friends appreciated his help. I make one positive phone call each day (week) to share good news about a student, and today Jonah is IT! Would you please tell Jonah I called? He knows this is a big deal in my Music room and he will want to know! Thanks so much!

Be positive with a specific example of what the child did and why that was a good thing.

And voila - it's done! WIN-WIN! It's doesn't take much time at all and spreads really good mojo between you and your parents.

Give it a try! I'd LOVE to know how it worked for you!

Happy Honking! Ellen

Saturday, August 26, 2017

The Secret to Parent Contact

Connecting with parents is such a powerful part of a teacher's job. Conversations and notes home are so important when establishing a relationship with parents. And when you're the one music teacher (or other special area teacher), you teach a whole lot more than 30 kids. So...how do you make contact with TONS of parents and not have it take TONS of time?

"brag tags" and phone calls

Brag tags are little pieces of paper with brief positive messages on them. You can write the messages or you have the messages pre-printed on the tags.
from Cara's Creative Playground

The easier way is use the pre-printed ones. Buy some fun Astro Brights paper and make copies. You'll get many tags on a sheet so you'll need to cut them down. I recommend finding the school's paper cutter or asking the art teacher if you could use the art room cutter. So much more efficient!

Hand out brag tags at the end of each class. Choose a FEW students who demonstrated behavior or character traits that you want everyone to show. Give them a brag tag. Record their names. A little check after each name on your roster is enough. The object is to give a brag tag to each student over time so you'll want to track this.

You're already thinking about some of your students who struggle to show appropriate behavior. How will they ever get a brag tag? You can give tags for effort, improvement or even stepping out of their comfort zone and trying something new.

Be sure to mention the reason the student is receiving the tag, ie. "Thomas I loved the way you helped Dylan on the recorder", "Ebony, you showed me you were really trying today", "Ayesha, I noticed you are working on your self-control. Keep up the good work!"

So...what do the kids do with these brag tags? Kids are proud to be recognized for doing something well. These tags can be stapled into their agendas, placed in take home folders or even displayed on the fridge at home. I encourage them to tell their parents about WHY they received the tags.


Brag tag templates can be found all over TPT and teacher blogs. In the past, I used Cori Bloom's Notes from your Music Teacher (link here) and Lindy DuPlessis's 35 Character Education Brag Tags (link here) Now I use Cara's Creative Playground's Growth Mindset Positive Notes (link here) .


In my next post, I will write about parent phone calls including a "script" for you to follow.


PSSSST! Next Thursday (and only Thursday), I will be giving you the chance to score my latest Musician in the Spotlight FOR FREE! Stop by my store and look for the newest product and download it for free! HINT: the musician is a MAJOR Country Music Star.

Happy Honking! Ellen

Sunday, August 20, 2017

2 ways to create calm transitions in your classroom

When I first started teaching I was so concerned about music content and materials that I didn't really consider transitions or even protocols for activities. The kids behaved so calmly in the halls with their classroom teachers but once they came into my room, they forgot all about that.

I told myself that was OK because I teach music, right?
And music is a noisy subject, right?

But honestly it felt chaotic to me and it kinda wore me out. I didn't realize that having structure, procedures and protocols for behavior in my classroom didn't make me a control freak. It made me a good teacher.

I needed to take charge. After all this was MY room and I wanted to be comfortable in it. When I'd ask the kids to be "good", that wasn't specific enough. So I decided that my music room needed some FORMAL routines for pretty much EVERYTHING.

I created a step-by-step protocol for entering the room and exiting the room.
Posters of the entrance and exit routines were hung in the front of the room for visual cues.
 

And then we PRACTICED them a few times in each class and not just at the time of the transitions. I made sure that transition looked and sounded like I wanted it to. And if the behavior slipped once in a while, we would review the expectations and do the transition again and get it right.
LINING UP

I also chose CALM activities that came right after entering and right before leaving in order to make the transitions smoother.  For example, you will notice we do "brain hook-up" right after sitting down.

Later on I even added a poster listing the order of the activities in the music class so students could anticipate transitions.

Having the students know the expectations gave them a point of reference. They knew how they were supposed to enter, exit, hand out materials, collect materials, etc. And when they were ready, I assigned leadership roles to students to give them more influence in creating our classroom atmosphere. See my earlier blog on JOBS.

By giving students guidelines to follow, they knew what I wanted them to do and that made a world of difference for me.

Happy Honking! Ellen
Related Posts Plugin for WordPress, Blogger...